HAND MADE CARDS

Shabby Chic Mother's Day Card
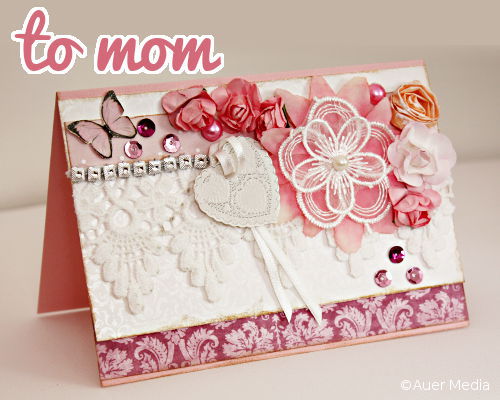
Make this beautiful shabby chic card to mom for Mother's Day. The list of supplies is pretty long, because the card is made of several small parts, but actually it's relatively simple and easy to make this card - and it's fun too! Just follow the tutorial!
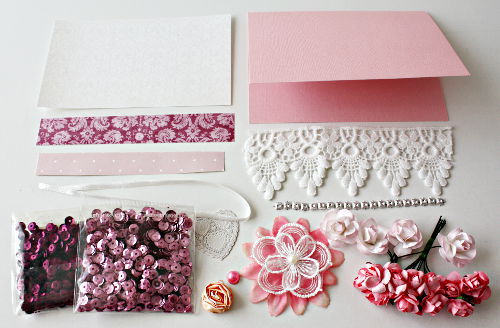
LIST OF SUPPLIES

- 1 horizontally folded card base
- patterned paper in light shade, the same width as the card base, but cut the patterned paper about 2,5 cm (1 inch) smaller vertically
- 3 cm (1,2 inches) high strip of coordinating patterned paper, the same width as the card base, it will be placed in the bottom of the card cover
- 2 cm (0,8 inches) high strip of coordinating patterned paper, the same width as the card base, it will be placed in the top of the card cover
- wide lace, the same width as the card base
- a little piece of silvery bling string
- 1 heart embellishement and about 10 cm (4 inches) satin ribbon, (if you like, the ribbon is not necessary)
- sequins
- a couple of flatback pearls or acrylic gems
- 1 large silk or lace flower
- 6 small paper roses in different coordinating colors and sizes
- 1 small paper butterfly or a butterfly sticker
- glue stick, double sided tape, foam squares or foam tape and craft glue (white pva-glue) or hot glue to adhere all the parts
- Ranger Distress Ink (color Vintage photo) to darken the edges of papers (optional).
HOW TO MAKE THE SHABBY CHIC CARD
- Start with cutting out all the parts that you will need.
- Ink the edges of paper parts and the cover part of the card with Distress Ink using an applicator or rub the edges against the ink pad. It'll give the card lovely shabby vintage look, but if you haven't got ink or if you don't like the look you can skip this step.
- Distress the edges of patterned papers with a scissor or a distress tool to "age" them. You can skip this part too if you prefer the edges to be clean and neat.
- Adhere the 3 cm (1,2 inches) wide strip of patterned paper at the bottom of the card so that a very narrow strip of the card cover will be seen. Use double sided tape, good glue stick or pva-glue.
- Adhere the large piece of patterned paper to the card so that a very narrow strip of the card cover will be seen at the top and most of the patterned paper will be seen at the bottom. Adhere it to the card cover, not to the patterned paper under it, to make the layers more visible.
- Place the last paper strip and the lace on the card so that the distance to the edges of the card is about the same on both sides. Lace is easy to glue with a regular glue stick, but just to make sure it will stick properly, it's good to use a little pva-glue or hot glue at the top of the lace. Leave the bottom part of the lace loose.
- Make a small hole to the heart embellishement and wrap a piece of satin ribbon to it.
- Group the flowers, pearls and the heart embellishment so that the focal point will be placed near either side of the card. Use the photo on this page as help if needed. When you're happy with the placement, adhere flowers and pearls with generous amount of pva-glue or hot glue. Use foam tape to lift up the upper part of the large flower to level with paper roses, if the center piece is flat like the flower in this card. Adhere the heart embellishment with little foam squares and let the ribbon flow down in between them.
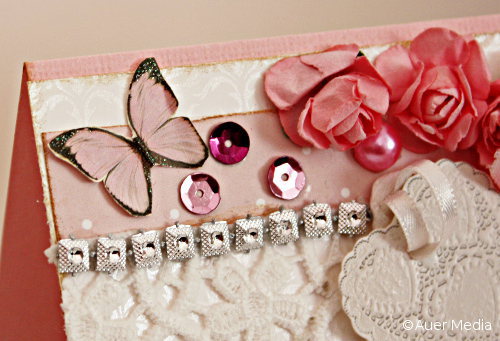
- Finally, adhere the sequins, bling string and the butterfly to the card. Bend the wings of the butterfly just a little bit so that it looks like it's floating on the card. Add your sentiments inside the card and you're done!

The shabby chic card was made on a textured, pink card base. The butterfly and the narrow paper strip were cut out of Mulberry Kisses 6"x6" paper pad by FSC. Other papers used in this project were basic vintage looking papers by J. K. Primeco, which is a Finnish brand. The peachy colored rose on the right corner is self made. You'll find a tutorial on making paper flowers here on Gamescraftscoloring.com later this year.
Watch a Youtube video tutorial on how to make this card:
- Youtube: Shabby Chic Mother's Day Card Tutorial >
More card making ideas: Hand made cards
© Auer Media
